(2014.01.27: major update, some new info added)
My main focus is macro photography of natural snowflakes. I do this with low cost variation of well-known reverse lens macro technique: compact camera Canon Powershot A650 at maximum optical zoom shoots through reversed lens Helios 44M-5 (this is lens from old film camera Zenit, made in USSR. Here is short description in wikipedia). This gives much better magnification than standard macro mode of camera. I shoot short serie of identical shots for each snowflake, and later average them (take arithmetical mean of all serial shots).


Camera works with CHDK - Canon Hack Development Kit: often it named "alternate firmware", but actually this is resident program, which placed on SD card. It autostarts when camera turned on and greatly enchances camera functionality. CHDK is not nessessary for this type of shooting, but it is extremely useful, because it writes RAW shots as well as standard JPEGs and able to execute scripts (i use script Ultra Intervalometer with zero delay between succession shots: it works as continuous serie of shots with autofocusing before each of them). CHDK is extremely powerful tool, and i highly recommend it to any photographer with compatible compact camera.

My technique is very inexpensive (i already had a camera and all components, and it costs me no money at all). I think, almost any compact camera can be used for this macro setup, preferrable one with good optical zoom and sensor with more megapixels.
My shooting place is open balcony of my house. I was lucky that i have such nice place, where nobody disturbed me and i can return into house when i freeze.
At the beginning, 6 years ago, i shoot snowflakes with just camera, without any add-ons, in standard macro mode. Canon Powershot A650 have 12 megapixel sensor and very good macro mode, with focusing ability started at 1 centimeter from the lens. This is enough for taking good snowflake shots, but in low resolution, because i cut only small central part of whole shot with snowflake and some surrounding background:
| source shot, 4000 x 3000 | processed picture, 800 x 600 |
 |  |
Depending of snowflake size, final resolution of picture varies from 640x480 pixels to about 1024x768, not more. This is enough for internet posting or making collages, but not for prints.
That times i captured snowflake with two methods: dark shots with bright snowflakes taken in natural light (usually it is diffused light of gray cloudy sky), using as background dark gray woolen fabric or green plastic carpet. I place this background at stool and, when good looking crystals falls on it, start shooting, touching background with hands and camera for steady shots. Camera shoots in macro mode from minimum possible distance. I only select in camera menu focusing by central point instead of auto focusing at multiple zones, so i able to focus precisely at center or front edge of crystal; and select exposure metering mode to central spot instead of evaluating from whole frame (this is nesessary, because with dark background and small bright snowflake automatic metering completely overbrightes crystal).
The other method, which i use for bright pictures with silhouette of transparent snowflake on it, is shooting at glass surface with backlight. For this, i place at floor of balcony turned upside down stool, and at it legs, horizontally - large sheet of glass. For being able shooting vertically down without any camera shaking, i make simple tripod replacement: from small plastic bottle i cutted out central cylindrical part in form of short tube. I choose length of this tube such that camera's lens, putted into it, do not reach other edge of tybe 1 centimeter (this is my minimum focusing distance of camera). When snowflakes falls at glass, i just put this tube with camera over a snowflake and shoot with 2 second delay (selected in menu), so i can remove hands from camera. With other hand, i light snowflake from bottom of the glass using simple LED flashlight. Light is stround enough for shooting even at night with short exposure time and at lowest ISO.
Some examples of snowflake pictures, taken in standard macro mode: old snowflake shots, 2009-2011.
Two years ago, instead of taking single shots of each snowflake, i started to capture short series (usually 8-10, sometimes more) identical shots for each crystal. This serie can be easily averaged and merged into one picture - this helps greatly to lower picture noise (or, in other words, boost signal-to-noise ratio) and reveals small and subtle crystal details, which almost invisible in every single shot, because they masked by noise level. I wrote separate post about averaging identical shots.
One year ago i started to use external optics for better magnification of snowflakes, and built very simple optical add-on for my camera. This macro setup based on Helios 44M-5 lens.

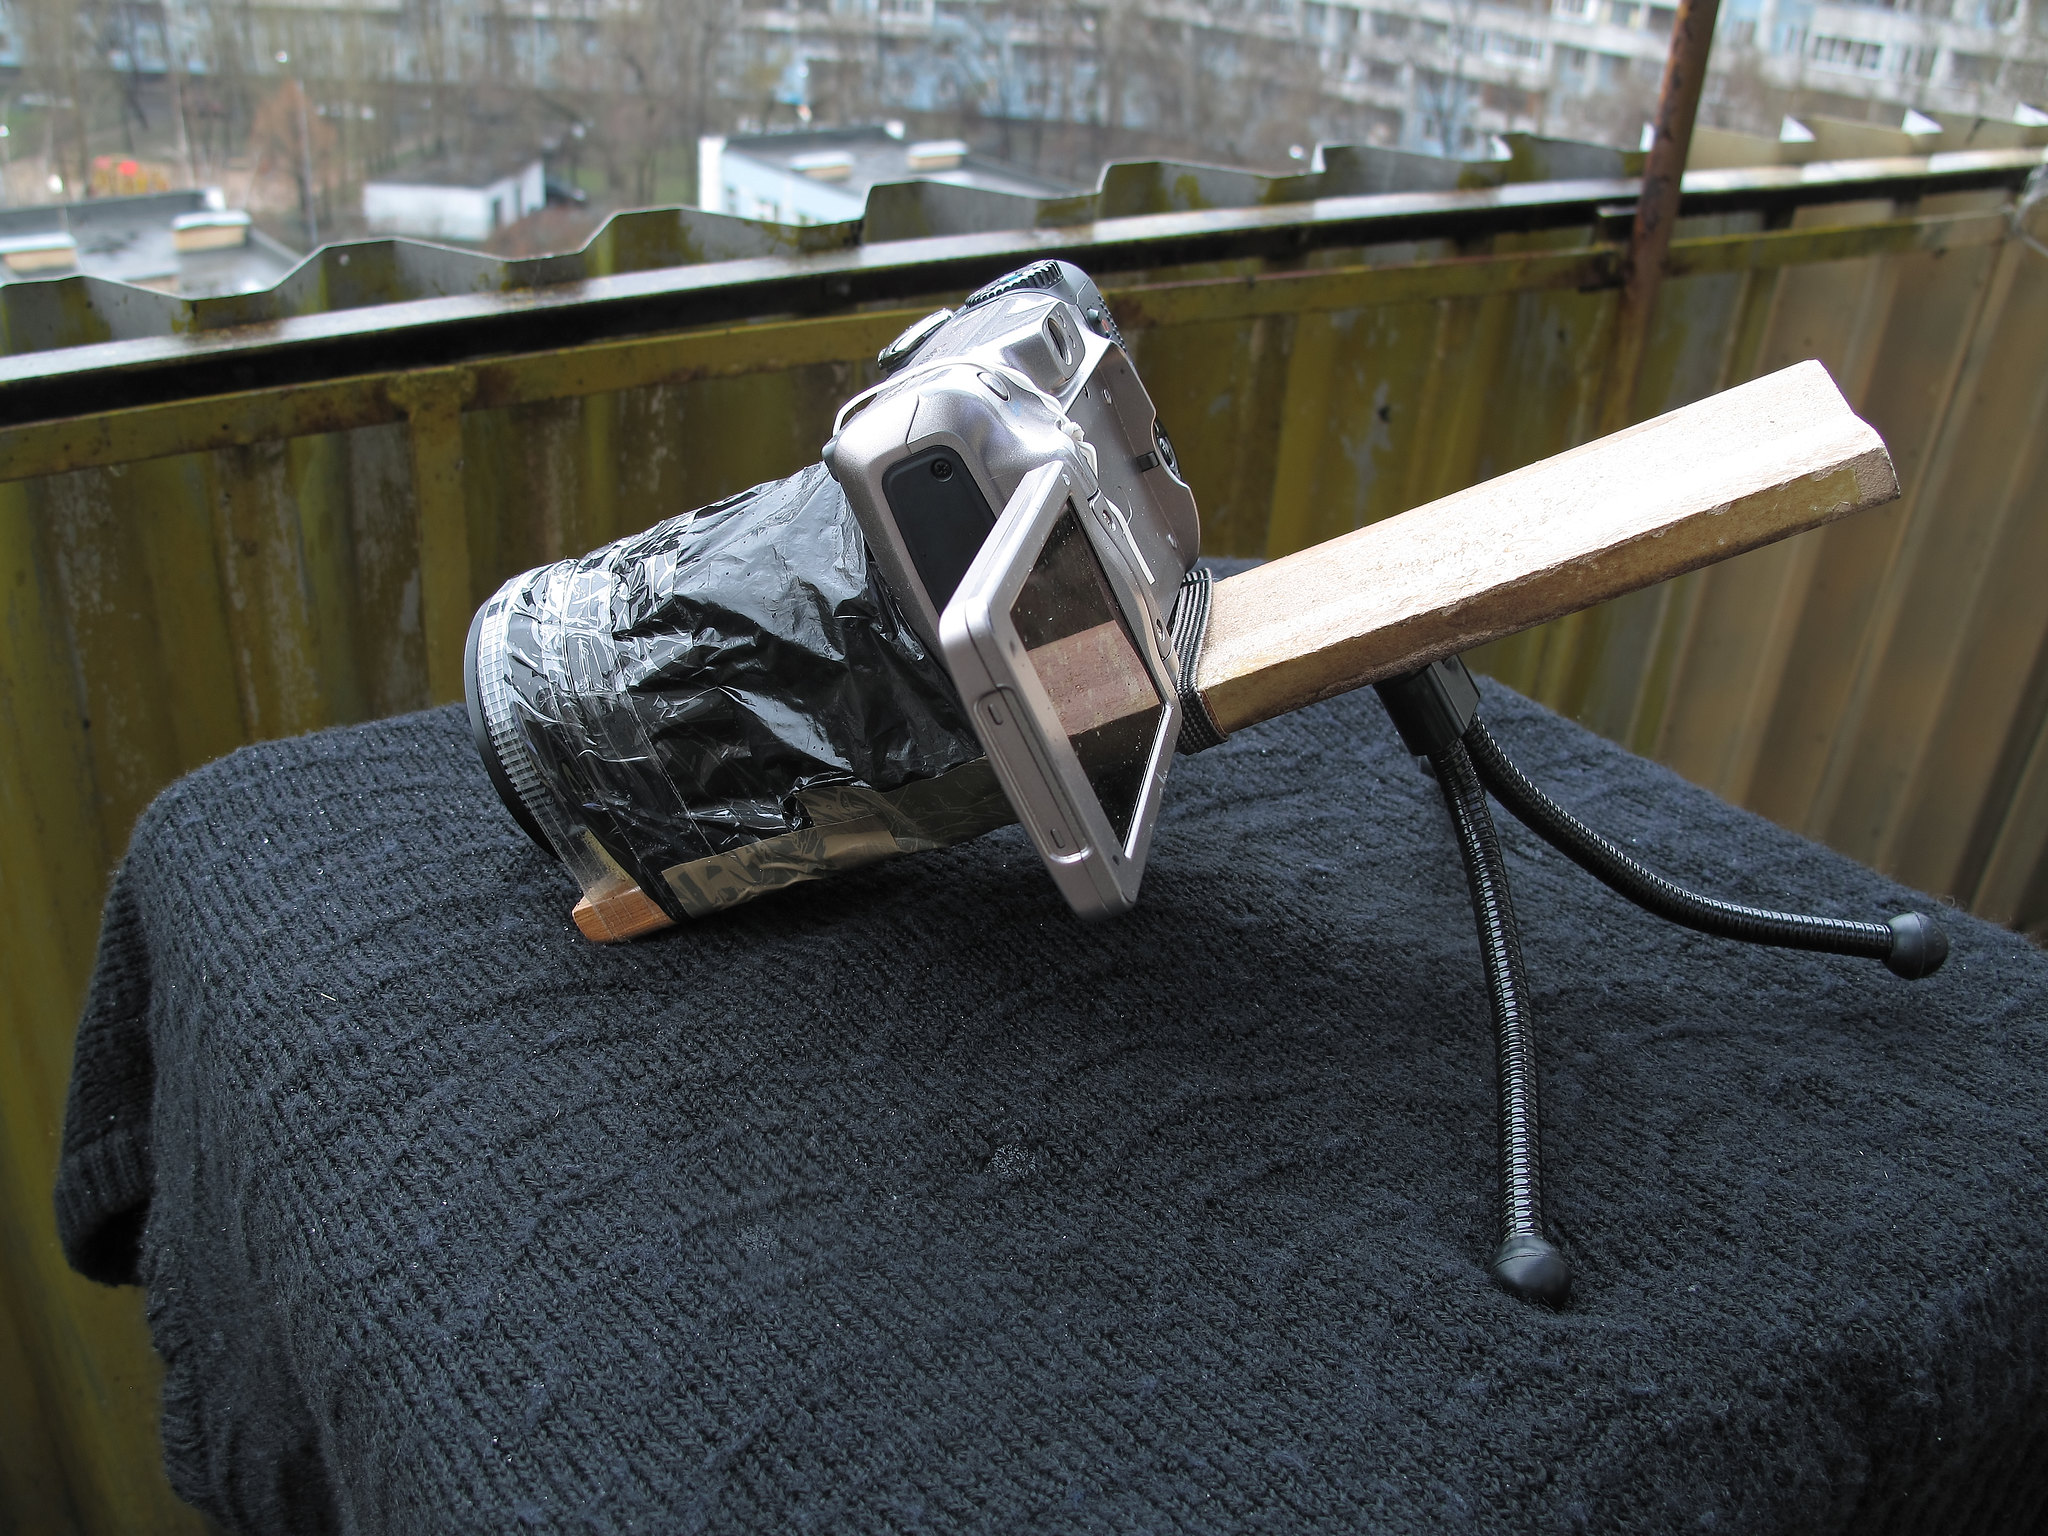
At first, i attached lens at narrow wooden board (around 30 cm long), reversed (back lens to shooting object, front lens to camera), and drilled in a board an opening for screw, suitable for tripod nest of camera. Then camera mounted on a board so that the built-in lens in the maximum optical zoom mode (6x) touched Helios lens and looked straight into it. I attached the camera with a screw and additionally with metallic bracket, glued to the board: it holds opposite side of camera, so it didn't move anywhere. On Helios back side (which is front side of whole construction) i attached three standard narrow extension rings from Zenit camera (this is nessessary only in case of shooting at glass surface with backlight, in all other cases i do not use them). These rings keeps lens at needed focusing distance from the glass with snowflakes (2,5-3 centimeters). Place of connection between internal and external lens i covered with some sort of skirt, maked from black plastic bag: this protects connection point from outer light, snow, ice and waterdrops. Whole design turned out rather strong and steadily stands vertically with lenses looking down. I simply put it on glass over the chosen snowflake and shoot in maximum optical zoom mode. Camera's autofocus works fine through external lens. For shots at dark background, i just use small desktop tripod with flexible legs, which i attached to back side of wooden board.
Simple scheme of add-on (larger image opens by click):

Assembled macro setup:


I capture snowflakes in two modes:
1. At horizontally placed glass sheet with backlight. My macro setup stands vertically at glass with optics looking down, i simply put it over chosen snowflake and shoot short series of identicals shots (usually 8-10, for most interesting snowflakes - even more). From bottom side of the glass i light snowflake using LED flashlight with diffusor (part of plastic bag), for more uniform light. I try to point flashlight not vertically up, but at some angle, then crystal looks more volumetric, with dark and light contours.

2. At dark opaque background: woolen fabric. For these shots i use only natural light of cloudy sky. I shoot at angle: far side of wooden board, at which Helios and camera mounted, stands at small desktop tripod with flexible legs, and i can easily adjust angle, at which camera looks at background. Near side of board with front lens lays at background. I shoot serie for one crystal and then move macro setup to new crystal.
Shooting is easy, but processing of picture takes significant time. At first, i align and average my series of identical shots. Then i do standard postprocessing: sharpening, additional noise removing, cleaning background from ice debris and unwanted adjacent crystals, color toning (i prefer adding blue colors to my shots: originals almost monochromatic gray and looks not appealing, at my taste) and finally, contrast curve.
This is an example unprocessed shots in two modes: standard Canon A650 macro mode and with external lens. Please click at images to open them in full 12 mp resolution:
| standard macro mode | Helios 44 |
 |  |
 |  |
Also i prepared another before and after table with unprocessed shots (straight out of camera) and final pictures.
Other photos with this macro rig:


When processing, i add to snowflakes some artifical colors, if they turn out too monochromatic. For latest shots i use simple multi-coloured lighting: i put a fragment of semi-transparent plastic bag with any color pattern on flashlight (for example, white+orange or blue+white+yellow colors). Because i hold flashlight far enough from glass with snowflake, i got smooth color gradient instead of pattern on background + multi-coloured facets of the crystals. Even if i don't like colors on source shots, this is no problem: i can easily convert colors to more pleasant ones using curves in LAB color space.
This is postprocessed snowflakes, cropped from full 12mp shots, taken with new macro setup.


Snowflakes with clearly visible thin film interference effect (nicely described in Wikipedia):


Several high resolution collages (download links and print options available by click on separate pages):


Recently i added desktop wallpapers section with snowflake photos.

All my snowflake pictures in album Snowflakes and snow crystals on Flickr. All photos are free for non-commercial use (Creative Commons Attribution-NonCommercial license), have full resolution and saved as Jpeg's at maximum quality settings. For commercial use, please contact me via e-mail.

If you are interested in snowflake photography, i recommend to view also:
• Biography and work of Wilson Bentley, pioneer of snowflake photography;
• Don Komarechka, canadian based professional photographer, who recently published great book about his methods of snowflake photography, physics of ice crystals formation and many other interesting topics:

• SnowCrystals.com, created by Kenneth G. Libbrecht - great resource about snowflake physics and photography. I especially recommend section about snowflake classification with photo examples of each type: A Guide to Snowflakes. Also, Kenneth's fantastic snowflake collection available on Flickr.
• And snowflake albums of excellent photographers on flickr:
• Pamela Eveleigh
• Fred Widall
• Mark Cassino
• David Drexler
• Linden.G
• Jessica
Author: Alexey Kljatov
Tidak ada komentar:
Posting Komentar